Battery switch on travel trailer function is crucial for managing your RV’s power. Understanding how these switches work—whether it’s a simple 1-2-both or a more sophisticated disconnect—is key to preventing dead batteries and protecting your valuable electronics. This guide breaks down the types of switches, their functionality, proper use, and safety considerations, ensuring you’re equipped to handle your travel trailer’s electrical system with confidence.
We’ll cover everything from choosing the right switch for your setup to troubleshooting common problems and performing basic maintenance. Learn how to maximize your battery life, avoid costly repairs, and keep your RV running smoothly on the road and during storage. We’ll even delve into advanced battery management systems to optimize your power usage and get the most out of your investment.
Battery Switch Selection and Installation
Choosing and installing the right battery switch is crucial for safely managing your travel trailer’s power. A properly installed switch protects your batteries and electrical system, preventing damage and ensuring reliable power. This section will guide you through selecting the appropriate switch and completing a safe installation.
Battery Switch Selection Factors
Several factors influence the choice of battery switch for your travel trailer. The most important are the amperage rating, the number of batteries in your system, and the desired mounting location. Selecting a switch with insufficient amperage can lead to overheating and potential fire hazards. Conversely, oversizing isn’t usually a problem, but it’s wasteful and increases costs.
So, you’re prepping for your next adventure? Awesome! First things first: make sure your travel trailer’s power is sorted. Understanding the battery switch on travel trailer function is key to avoiding dead batteries and a frustrating trip. Once you’ve got that nailed, you can focus on the fun stuff, like setting up your awesome audiophile travel setup – because good tunes make any journey better.
Seriously, don’t underestimate the power of a killer playlist!
Amperage rating should be significantly higher than the maximum current draw of your appliances and charging systems. For example, if your total system draw is 100 amps, you should choose a switch rated for at least 150 amps to provide a safety margin. The number of batteries determines the type of switch you need. A single battery system only requires a simple on/off switch, while dual battery systems typically use a switch that isolates each battery or allows for combining them.
Consider the available space and accessibility when choosing a mounting location. It should be easily accessible for operation but also protected from the elements.
So, you’re hitting the road in your travel trailer? Awesome! First things first: make sure you understand your battery switch on travel trailer function – it’s crucial for keeping your lights and appliances running. Once you’ve got that sorted, think about your entertainment. For the serious music lover, check out this guide on creating an audiophile travel setup to enjoy your favorite tunes on the road.
Proper power management and killer sound – that’s the recipe for a great trip!
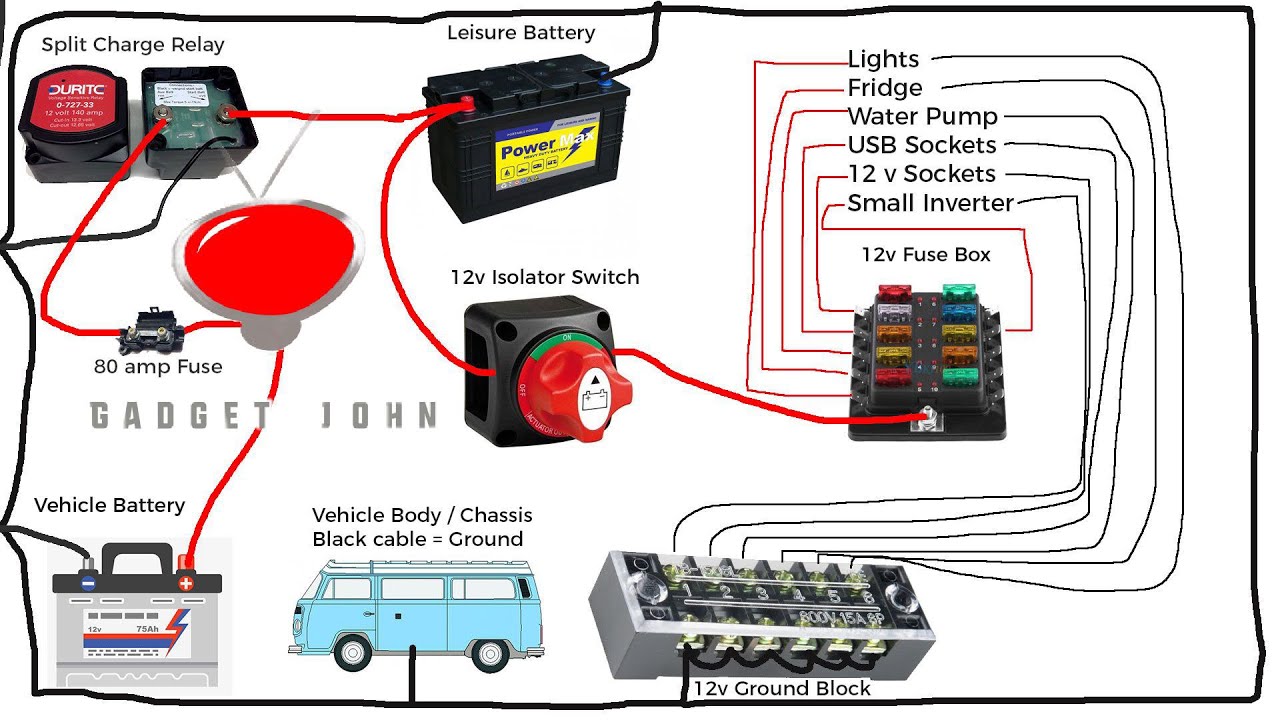
Battery Switch Installation Steps, Battery switch on travel trailer function
Proper installation ensures the longevity and safety of your battery switch. This process involves careful attention to wire sizing, connections, and grounding. Improper installation can lead to system failure, fire hazards, and even injury.
First, disconnect the negative terminal of your batteries to prevent accidental short circuits. Then, carefully plan the switch’s location, ensuring easy access. Securely mount the switch to a stable surface using appropriate hardware. Next, connect the wires. Use appropriately sized wiring to handle the current draw; undersized wiring can overheat and cause a fire.
Consult a wiring chart to determine the correct gauge for your system’s amperage. The positive cables from each battery should be connected to the switch’s input terminals. The output terminal from the switch connects to the positive bus bar or distribution panel. Ensure all connections are tight and secure, using appropriate connectors and crimp tools for reliable performance.
Finally, reconnect the negative battery terminals.
Grounding the Battery Switch
Proper grounding is essential for safety and optimal performance. A poorly grounded system can lead to voltage fluctuations, corrosion, and potential shock hazards. The battery switch should be grounded directly to the chassis of the travel trailer using a heavy-gauge wire. This ground connection provides a safe path for fault currents, preventing damage and ensuring electrical safety. The ground wire should be connected to a clean, unpainted metal surface on the chassis.
A corrosion inhibitor paste can be applied to the connection to prevent corrosion over time. Always double-check all connections before reconnecting the negative battery terminals.
Advanced Battery Management Systems
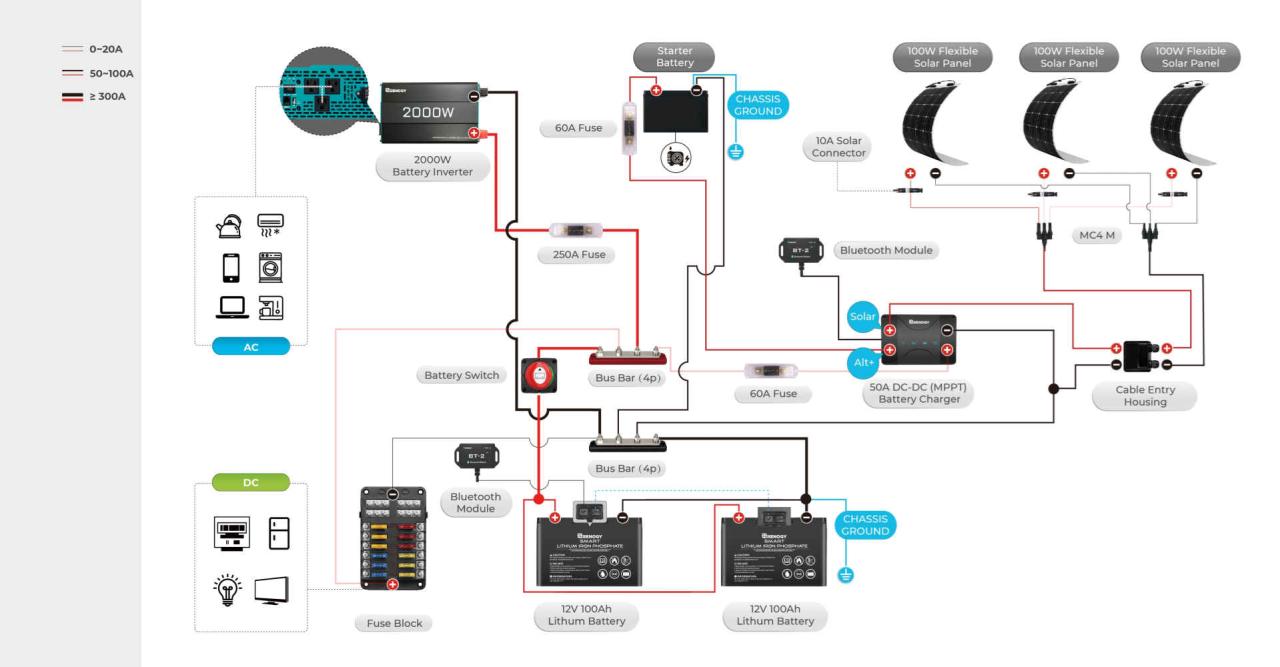
Upgrading your travel trailer’s power system beyond a simple battery switch often involves incorporating advanced battery management systems. These systems offer a significant leap in control, monitoring, and protection, maximizing your battery’s lifespan and preventing costly damage. They work in conjunction with, and greatly enhance, the functionality of your battery switch by providing real-time data and automated control features not possible with a switch alone.Advanced battery management systems integrate with your battery switch by either directly controlling the switch (in some sophisticated setups) or by providing critical data that informs your decision-making regarding switch operation.
For example, a system might automatically disconnect a battery bank if it falls below a pre-set voltage threshold, a function a simple switch cannot perform. This seamless integration prevents accidental over-discharge and extends the life of your batteries considerably.
Battery Monitoring System Benefits
Using a battery monitor alongside your battery switch offers several crucial benefits. The switch itself simply connects or disconnects power; it doesn’t tell you anything about the state of your batteries. A battery monitor, however, provides continuous real-time data on battery voltage, current, and state of charge (SOC). This allows you to make informed decisions about power usage, preventing premature battery drain and maximizing the effectiveness of your power system.
Knowing precisely how much charge you have available lets you plan your energy consumption accordingly, avoiding unexpected power outages during your travels. For instance, you can determine whether you can safely run your air conditioner for an extended period based on your battery monitor’s readings, preventing a complete discharge.
Types of Battery Monitoring Systems
Several types of battery monitoring systems exist, each with its own advantages and disadvantages. Simple analog meters display voltage, offering a basic understanding of battery health. These are inexpensive but lack the precision and detailed information provided by more advanced systems. Digital meters offer a more precise voltage reading and often include additional data like current draw and state of charge (SOC) calculations.
These are more accurate and informative than analog meters but still might lack the sophisticated features of more advanced systems. Finally, sophisticated systems often incorporate Bluetooth or WiFi connectivity, allowing remote monitoring via a smartphone or computer. These advanced systems can provide extremely detailed data logging, often including historical data, allowing for detailed analysis of your power consumption habits.
They frequently offer advanced features such as alerts for low voltage or high current draw, further enhancing battery protection. A good example of a sophisticated system might include multiple shunt-based sensors for monitoring multiple battery banks, and software capable of predicting remaining run time for specific appliances.
Mastering your travel trailer’s battery switch isn’t just about avoiding a dead battery; it’s about ensuring a safe and enjoyable RV experience. By understanding the different switch types, their functionality, and proper maintenance, you can confidently manage your power, protect your equipment, and hit the road with peace of mind. Remember to always prioritize safety when working with electrical systems and consult a professional if you’re unsure about any aspect of your RV’s setup.
Questions Often Asked: Battery Switch On Travel Trailer Function
What happens if I leave my battery switch in the “off” position?
Leaving the switch off completely disconnects your house batteries from the trailer’s electrical system, preventing power drain. This is ideal for long-term storage.
Can I use a battery switch with different battery types (e.g., lead-acid and lithium)?
Generally, no. Different battery chemistries have different voltage and charging requirements. Using the wrong switch could damage your batteries.
How often should I inspect my battery switch?
Inspect your battery switch at least once a year, checking for corrosion, loose connections, and proper operation. More frequent checks are recommended if you frequently use your RV.
What size wire should I use for my battery switch?
The wire size depends on the amperage rating of your switch and batteries. Consult the manufacturer’s specifications and use appropriately sized wiring to avoid overheating and potential fire hazards.
